An overwhelming amount of pattern drafts for tablet weaving are published in print and online publications, yet, sadly, not all weavers can make use of these treasures. It’s not too rare occasion to hear that some patterns’ libraries include “confusing pattern drafts that are very difficult to work from” – and same resources are praised and cursed by different people. The reason for this is simple: there is no unified standard for marking down tablet weaving patterns. Most pattern authors tend to use their own systems, and, as a result, even visually similar drafts can be read completely differently. This is especially true for older drafts that had been put together before weaving software became widely used. And so, it can be rather difficult to understand how to work with specific pattern drafts. For a beginner weaver, this can become a serious obstacle.
The problem is recognised in the international community of weavers, and since spring of 2008, several attempts have been made to set a standard for tablet weaving pattern drafts. However, this work is yet to produce results.
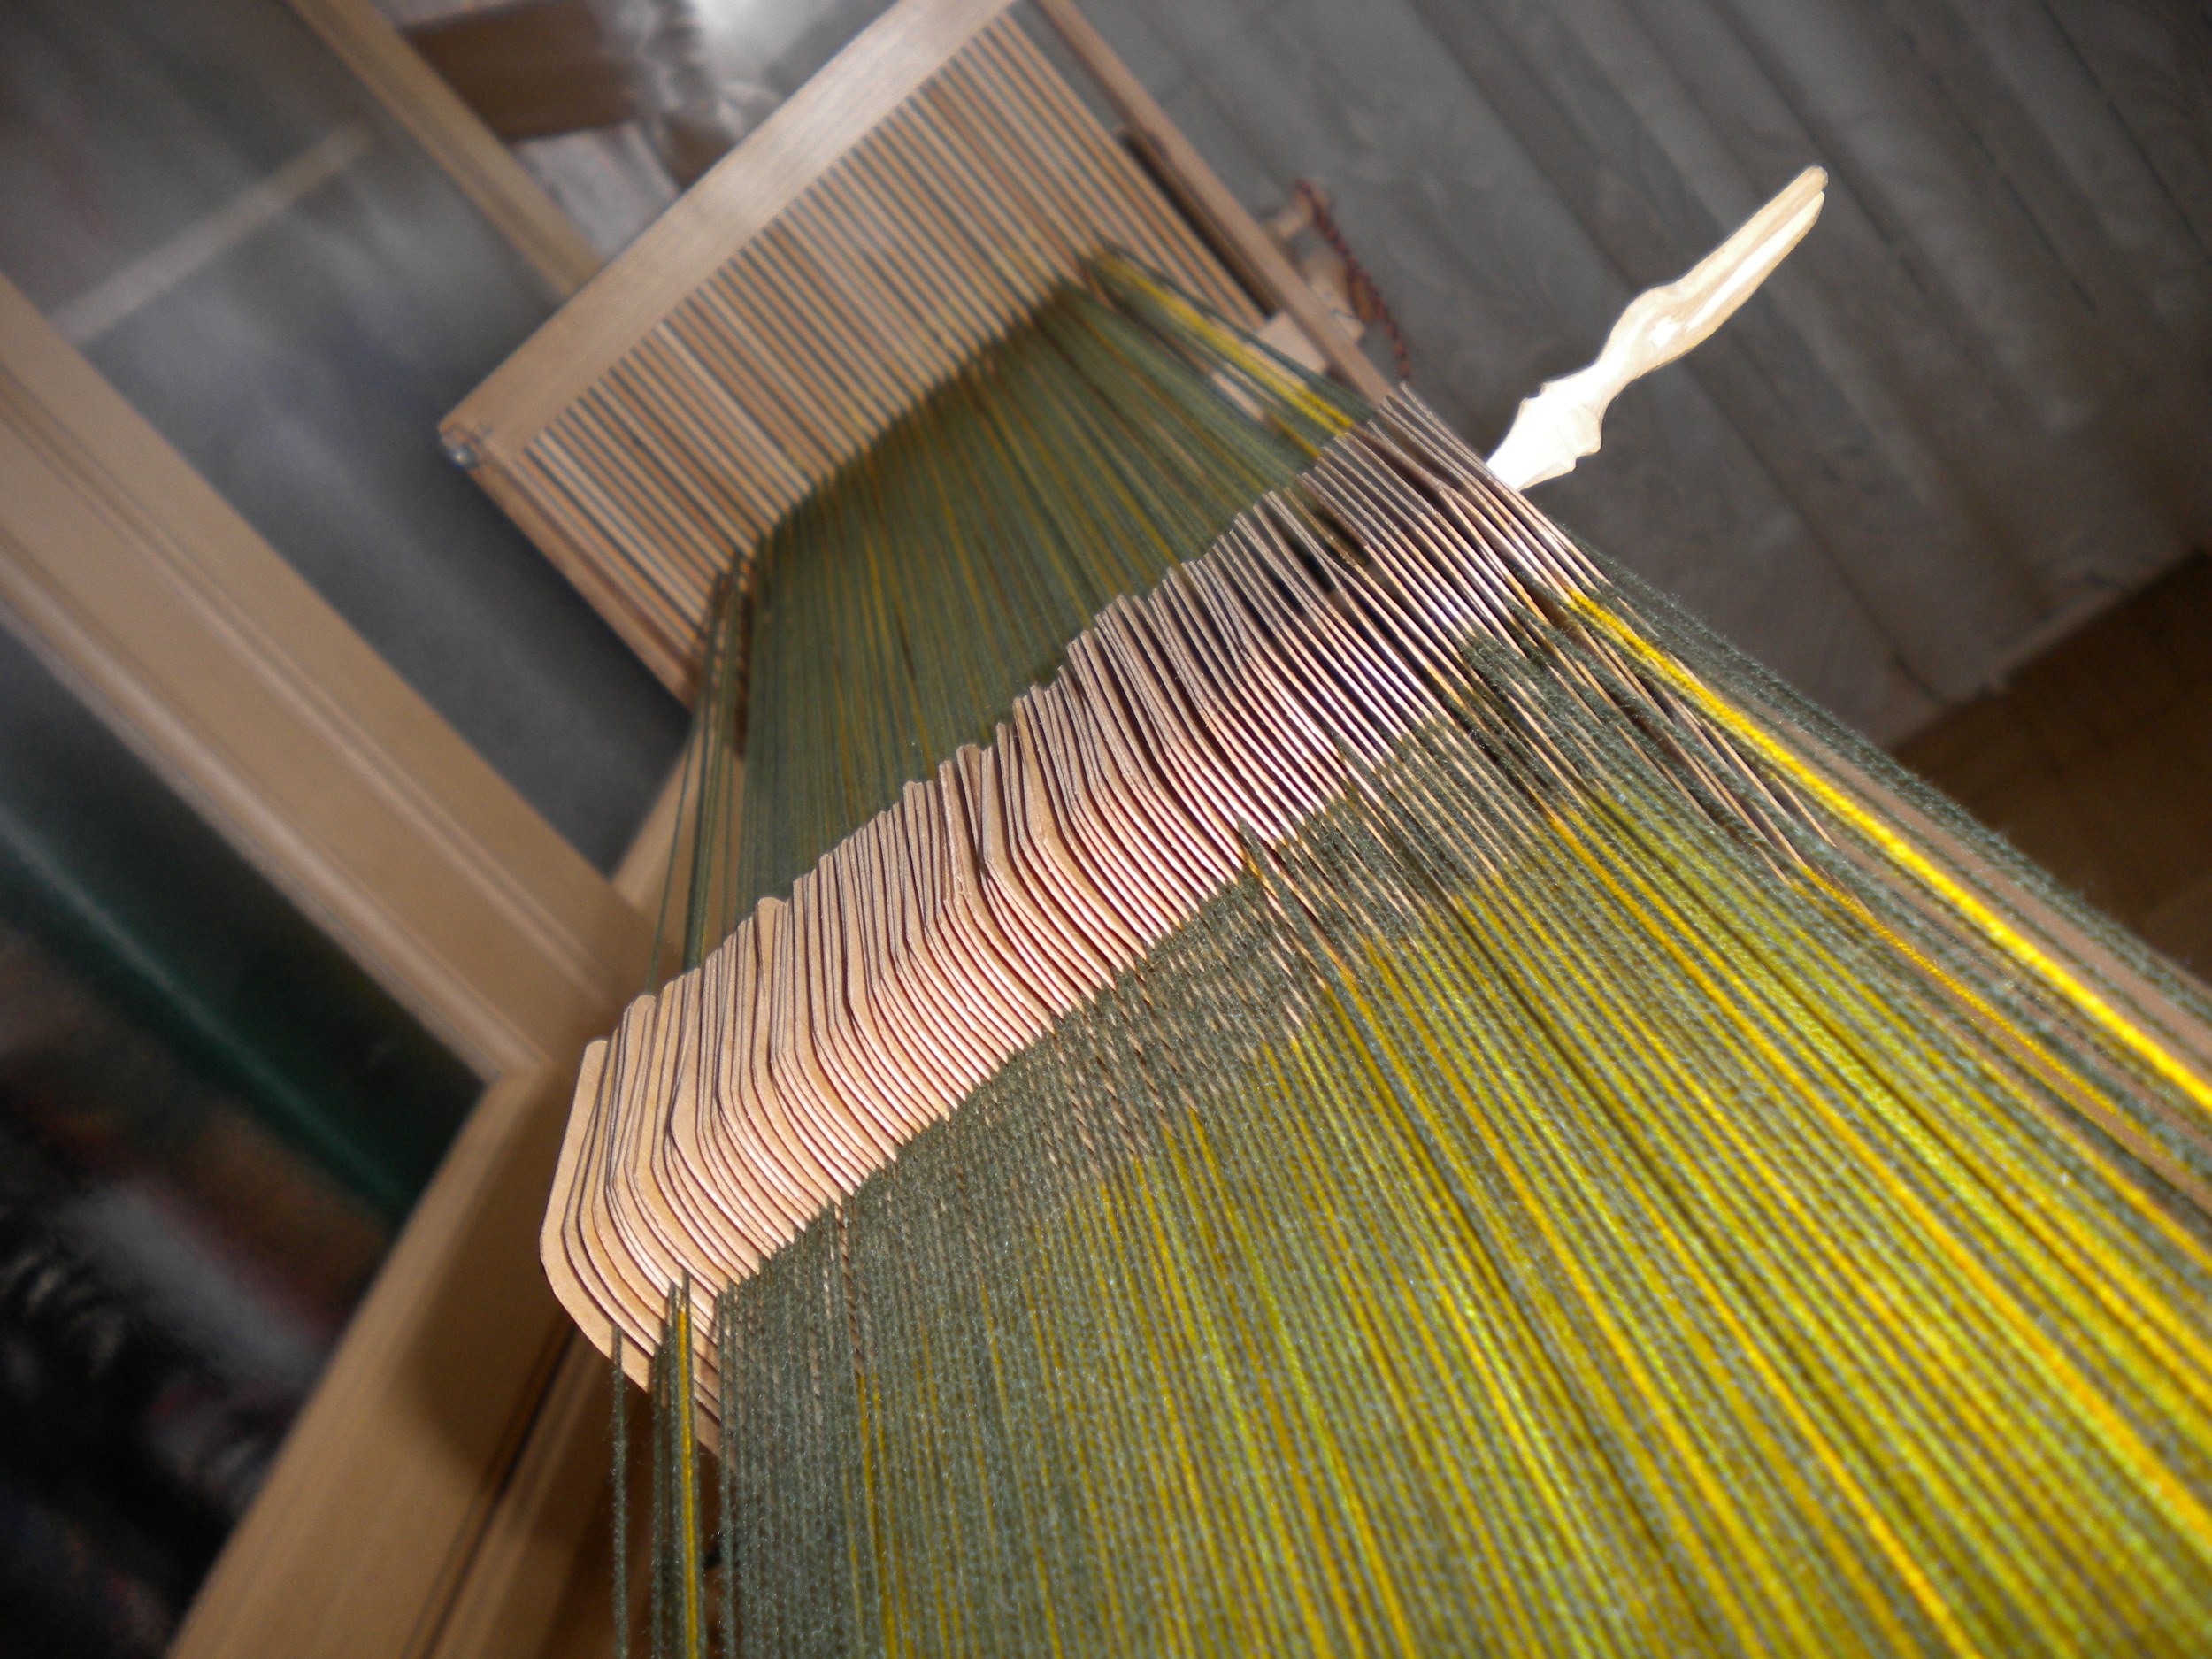
This article is intended to help you understand the most common systems used for drafting tablet weaving patterns without help from software solutions, and to make it easier to work with the patterns published in Workshop collection. Everything below is based on weaving with classic rectangular tablets.
Patterns draft elements
The usual elements of a tablet weaving pattern draft are a threading diagram, a tablet turning sequence and a band draft. A full set including all of these elements is optional, a pattern draft can consist of only one of them, or any combination. Also, information on threading and turning sequence can be given as a text rather than a diagram. Regardless of draft type, following needs to be clarified before the actual weaving can start:
Additionally, at the end of this page you will find:
- examples of pattern draft elements’ combinations;
- useful tips for using patterns drafts from the Workshop collection.
Weaver’s position
Most weavers prefer to beat towards themselves when weaving, so the band is coming together at the end of the warp closest to the weaver. However, some weavers work the other way around; they beat away from themselves, so that the band grows from the farthest end of the warp towards them. This technique is described in ethnographic materials, and is more familiar to those who have worked on a vertical loom. This is also Guntram’s preferred technique.
It is not common to indicate the direction of weaving or position of the weaver next to the pattern draft. So before you start working with the draft by a particular author, it is worth making sure which way they work and which way they draft their patterns. This determines the way you should read the threading diagram and also the turning sequence. The below is based on the most common option – beating towards yourself, so turning the tablets forward means turning them away from you and the band, and turning them backward means turning towards yourself and the band.
Initial tablets’ position
When tablets are threaded, they will slant in one or another way in relation to the warp, and will never be parallel to it. There are three different ways to indicate the initial tablets’ position in relation to the warp: a backslash and a forward slash (\ and /), letters S and Z, and horizontal arrows. These symbols can be usually found under the threading diagram and sometimes in the text.
The slashes are possibly the easiest pair of symbols to work with, although not the most popular. In tablet weaving drafts, they indicate – almost without exception – the position of the tablets relative to the warp threads. In addition, the slash also shows you which way the warp threads will twist when the tablet is rotated forward.
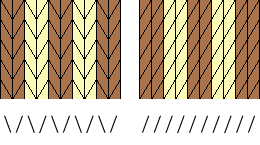
On the left, you can see two band drafts based on basic threading. Depending on the initial tablets’ position, the structure of the band will be different while producing similar stripes as a pattern. The slashes are usually used combined with either a threading diagram or a band draft, but almost never in the text.
As an example, slashes are used in pattern drafts at The Loomy Bin.
Letters S and Z as symbols are used not only in tablet weaving, but in many other textile techniques. For example, these letters indicate thread twist direction during spinning. The specific letters are not chosen by chance – their middle elements indicate the intended direction. But this is where it gets tricky.
Unlike slashes, S and Z in tablet weaving can be used to indicate either the slant of the tablets, or the position of the warp threads in relation to the tablets. So it makes sense to clarify this before threading the tablets as getting it wrong will either produce an opposite to the desired pattern (perhaps even a nice one?), a changed structure of the band, or, worst case scenario, a complete mess.

On the right you can see an example of the basic threading, and two band drafts. Tablets are turned continuously forward in both cases, but for the first draft, S and Z under the threading diagram are read as indication of warp position relative to the tablets, and in the second case as tablets position relative to the warp.
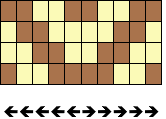
Most often, S and Z are used to indicate warp threads’ position, for example, in the book The Techniques of Tablet Weaving by Peter Colligwood, in pattern drafts by Carolyn Priest-Dorman, or in GTT software by Guntram.
Horizontal arrows are used in very rare occasions and, similarly to letters, these can indicate either warp or tablets’ position. On the left, the arrows indicate tablet’s position, or rather, the slant of the tablets in relation to the warp.
You can find examples of arrows’ use in pattern drafts by Guido Gehlhaar.
Warp threading
If all tablets are threaded the same way, or every tablet carries 4 threads of the same colour, specifics of warp threading can be presented in a text. In other cases, threading diagram will be given as table, with each column of 4 cells representing one tablet and four holes in it. The rows of the table (and corresponding holes in tablets) are usually marked by letters A, B, C and D, the cells are either coloured, hatched, or marked with symbols representing specific colours (symbols and hatching are mostly used when multi-coloured pattern is drafted in black-and-white).
In order to read such threading diagram correctly, you need to check how the rows should be read (bottom to top or top to bottom), and also what is the initial position of tablet holes.
Threading diagrams that have to be read bottom to top and top to bottom are equally widely used, so if there are no letters next to threading diagram to help you out, you need to get creative. In case of simpler patterns, especially where all tablets are turned together, it is possible to figure out the threading diagram reading direction by comparing it to (hopefully available) band draft.
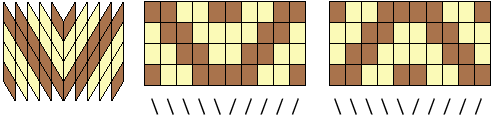
On the right, you can see another simple example based on the threading used previously. Band draft shows 4 rows of the band woven by rotating all tablets forward. The threading diagram in the middle should be read from bottom to top and it resembles the pattern of the woven band. The far right threading diagram should be read from top to bottom, and it mirrors the pattern of the band.
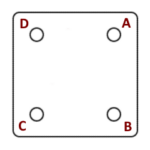
The explanation above is based on the most commonly used initial position of the tablet holes: А is top hole closest to the weaver, B is bottom hole closest to the weaver, C is bottom hole farthest from the weaver, and D is top hole farthest from the weaver. On the left, the tablet is shown in described position, with the weaver on the right of this tablet.
Some drafts are, however, based on a different initial tablet position, with A still being the top hole closest to the weaver, but B being the top hole farthest from the weaver, C – bottom hole farthest from the weaver, and D – bottom hole closest to the weaver. In this case, respective instructions are usually (but not always) given next to the draft.
Pattern repeat and turning sequence
Turning sequence can, once again, be given in the text, or visually. Only text can be used in case of simple patterns, where tablets are turned together or in two packs, and pattern repeat is not too long. Occasionally, you can come across more complicated descriptions in the text, as in case of this pattern by Carolyn Priest-Dorman.
Visual representation of turning sequence is, most commonly, a table that should be read from bottom up. As with threading diagrams, columns represent tablets. Each row represents one turning of the tablets. In each cell, there is at least information about the direction this specific tablet should be turned: either forward or back. There’s a variety of options beyond this minimum requirement, sometimes these tables give you at least a basic idea of the pattern, sometimes there’s not even a hint.
Change of turning direction for the tablet can be indicated by:
- colour change (most commonly white to gray) or hatching, where white cell means the tablets turns forwards, and gray or hatched cell means it turns back;
- slashes, where slash corresponding with initial slant of the tablet means the tablet turns forward, and the opposite slash means the tablet turns back;
- arrows, where arrow pointing up indicates tablet turning forward, and arrow pointing down indicates tablet turning back.
Colours and slashes can be used in the same draft, also cells (or slashes) can be coloured according to the colour of the warp thread passing on top during that specific row thus creating the pattern. alternatively, cells can have letters in them indicating the hole in the tablet that will carry to warp thread across the top during that row.
In some cases, a pattern would need “an intro”, a few rows different from the repeating sequence. This is always described in the text next to the draft. If such intro is shown visually, it is usually clearly marked, for example, separated from the rest of the pattern sequence by a clear line.
Examples of pattern draft elements’ combination
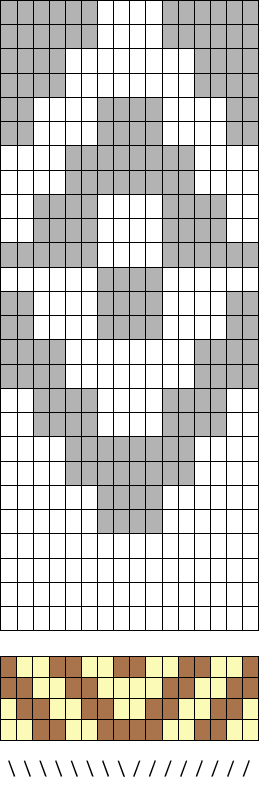
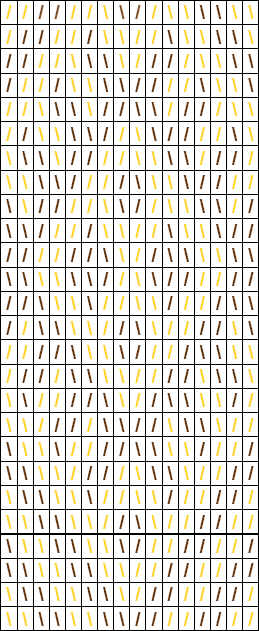
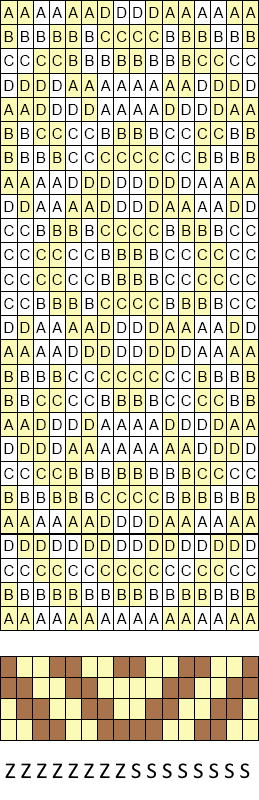
Below, you can find a few examples of patterns drafts utilizing different elements. All of them are based on the same pattern published in Workshop collection.
Threading diagram is a separate table at the bottom, with initial tablets’ position indicated under it using slashes. Turning sequence table includes only colour coding: white cells for turning forward, gray cells for turning back, so the actual pattern is not obvious.
Threading diagram is the bottom part of turning sequence table, with initial tablets’ position and turning direction indicated by slashes inside the cells. The colour of the slashes corresponds with the colour of respective warp threads. This type of turning sequence diagram shows the pattern most clearly.
Threading diagram is a separate table at the bottom, with initial tablets’ position indicated under it using letters S and Z. Turning sequence table includes letters from A through to D, indicating the top hole per each tablet in each row. One of the colours is also added to the table.
Useful tips for using patterns drafts from the Workshop collection
- Weaver’s position is at the working end of the warp, weaving and beating towards yourself. Turning tablets forward is turning them away from you and the band.
- All pattern drafts in the Workshop collection include at least a threading diagram, a band draft and a text description of turning sequence. For more complicated patterns, turning sequence is shown visually.
- Initial tablets’ position is shown under the threading diagram using slashes which indicate the slant of tablets in relation to the warp.
- Threading diagrams have letters A through to D on the side, and should be read from bottom to top.
- Holes in the tablets are marked, as per most common version, from A as top hole closest to the weaver, to D as top hole farthest to the weaver.
- Turning sequence tables include both colour coding and slashes to show turning direction of the tablets.
- Pattern repeats are separated by a coloured line in turning sequence tables. Intro rows, if applicable, are described in the text and also drawn out in the turning sequence and separated by a line from the rest of the pattern.
- Patterns for GTT are created based on software own logic, so text descriptions on pattern pages do not work for those. If you are using a GTT draft, please use the instructions provided by the software.